The Memory Preserver
By the end of this guide, you will have a clear, three-level workflow for saving unusable photos. You will be able to:
Introduction: The Post-Production Workflow
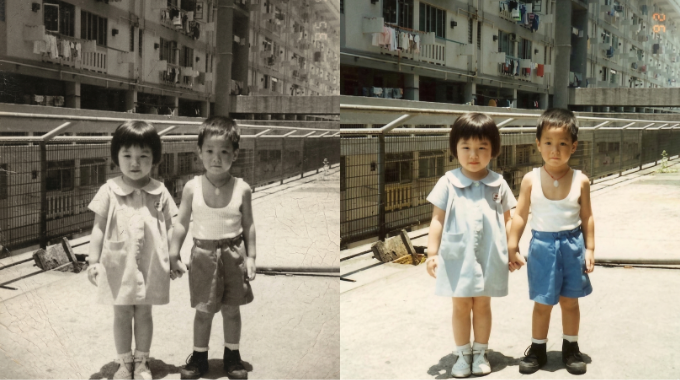
In 2026, we do not simply "apply a filter" to restore a photo. Restoration is a hierarchical process. Some tasks require speed (Nano Banana 2), while others require deep physics reasoning and high resolution (Nano Banana Pro).
To manage your daily quotas and get the best results, you must adopt the Hierarchical Workflow: Start with a basic automated repair, move to conversational touch-ups, and finalize with a Pro upscaling pass.
The 3-Level Guide to Restoration
Level 1: Basic Restore (Fast & Automated)
The Goal: Instant repair of obvious physical damage and broad sharpening.
The Engine: Nano Banana 2 (Flash). This level is low-cost and ideal for rapid assessment.
The Action: Upload your damaged photo and provide a simple, logic-based repair prompt.
1. Upload: Insert your old photo (JPG/PNG).
2. Reasoning Prompt: Give a single command that covers the entire image. Focus on Repair and Focus.
Example Level 1 Prompt: "Analyze this photo. Remove all physical scratches, dust, and crease lines. Sharpen the faces to bring the eyes into clear focus, ensuring the likeness remains identical. Keep it black and white."
Level 2: Advanced Touch-Up (Conversational Editing & Color)
The Goal: Surgical refinement. Fixing areas Level 1 missed, colorizing, or modifying scene elements.
The Engine: Nano Banana 2 or Pro (depending on complexity).
The Action: Interact with your image iteratively through conversation or circle-to-edit tools.
Refinement Prompt: Ask Gemini to adjust specific parts.
Example Level 2 Prompt: "This looks much better. Now, accurately colorize this 1980s street scene based on historical context. Also, use the conversational editor to remove the water bottle on the table and replace it with a sleek 1980s-era mobile phone."
Level 3: Pro Rescale & 4K Polish (The High Ceiling)
The Goal: The final production asset. Maximum resolution, texture reconstruction, and archival quality.
The Engine: Nano Banana Pro. This triggers the Reasoning Pass to ensure physical logic at 4K.
The Action: Take your finalized Level 2 image and upgrade it to the Pro tier for the "final polish."
1. Upgrade: Click the three-dot menu on the image you love and select "Redo with Pro."
2. Texture & Resolution Prompt: This is crucial. Now that Pro's physics engine is active, you must include Material and Texture keywords to guide the upscaler.
Example Level 3 Prompt (Upgrade): "Redo this image with Pro. Upscale natively to 4K resolution. Use Nano Banana Pro's reasoning pass to add realistic fine-grain human skin pores, authentic wool fabric texture to the suit, and the distinct look of Kodachrome film stock grain. Ensure the lighting is sophisticated and moody."
Summary of the Restoration Workflow
Restoration isn't a one-click button; it's a ladder.
Prompts to Try Today
Now it's your turn. Upload a problematic photo and try these "architected" prompts:
The "Blurry Selfie" Fix (Level 1)
"Upload [photo]. Apply facial reconstruction logic. Make this image crystal clear, especially the eyes. Remove any motion blur. Preserve identity at all costs."
The "Creased Heirloom" Repair (Level 1)
"Upload [photo]. Analyze for physical damage. Semantically fill in the large crease in the middle and the missing corner on the left to match the surrounding texture. Do not add color."
The "Historical Reset" (Level 2)
"Take this 1940s photo. Accurately colorize based on the fashion of the era. Use conversational editing to change the 'overcast sky' to a bright, clear sunset, adjusting the lighting on the subjects to be warm and directional."
The "Print-Ready 4K" (Level 3 - Use after Redo with Pro)
"Redo this image. Native 4K upscale. Reasoning pass on: 1. Fine pore skin texture, 2. The specific weave of denim fabric, 3. Grain from a professional film camera. Soft diffused studio lighting."